Configure Dial-Up Networking in Windows 95 / 98 / ME
OS Versions: Windows 95, Windows 95 OSR2, Windows 98, Windows 98-SE, ME
Please note that this How-To has been based on use of Windows 98-SE, but also applies to users of Windows 95, 95 OSR2 and Windows 98. Further note that this guide is based on a standard home-user configuration. Contact your System Administrator if configuring for a network.
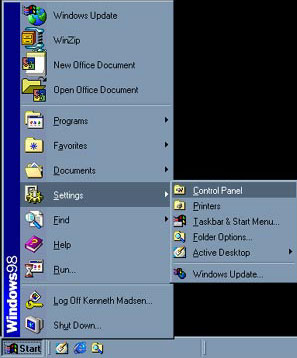
[Step 1:] In the lower left corner of your desktop
Click Start ->
Click Settings ->
Click Control Panel |
 |
|
| [Step 2:] In Control Panel find the Modems icon and double-click it |
 |
| |
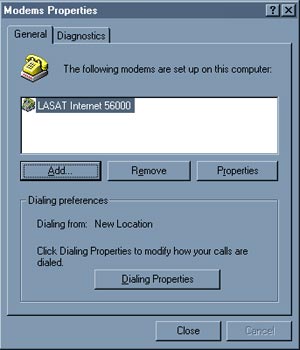
[Step 3:] The Modems panel opens and you can see the modems you have installed in Windows. Make sure that you have a modem installed. If this is not the case, click Add and follow the on-screen instructions.
Note that if you do not have any modems installed, this will automatically start a Windows Modem Installation Guide.
Upon verifying that you have a modem installed, click Close |
 |
| |
[Step 4:] Go to your desktop and double-click the icon My Computer to open a window containing an overview of your system drives (3½ Floppy, C:, CD-ROM, etc), as well as the system icons.
Double-click on the one called Dial-Up Networking |
 |
| |
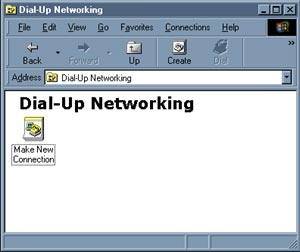
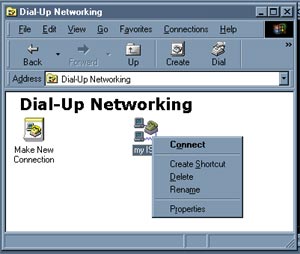
| [Step 5:] The Dial-Up Networking window opens, and if you have not already made a Dial-Up Networking (DUN) connection, the window will be empty except for the icon Make New Connection - double-click this icon |
 |
| |
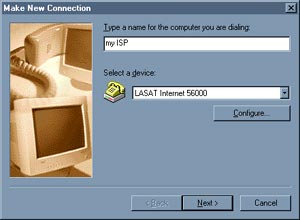
[Step 6:] Now the Dial-Up Networking 'Make New Connection Guide' starts.
In the field "Type a name for the computer you are dialing" type in the name for the connection (in the example we have entered 'myISP').
This is the name by which it will be represented in Windows.
Typically, this should be 'Argon'.
Now, turn your attention to the field "Select a Device." Here you should find the name of your modem you have installed (in this example, a LASAT Internet 56000). Simply click the small arrow in the rightmost corner to activate the scroll-bar and find your modem in the list.
Now click on the button "Configure" |
 |
| |
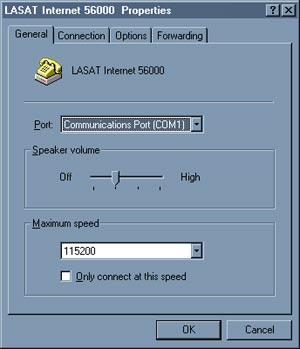
[Step 7:] Now the window Modem Properties opens.
Under the first pane "General", you have an overview of the COMport settings, and you are informed what COMport your modem is installed on (in the example COM1).
Chose 115200 as the Maximum Speed for your modem. Most COMports do not support a higher setting than this, and forcing this higher could result in no communication with your modem.
Now click on the pane "Connection" |
 |
| |
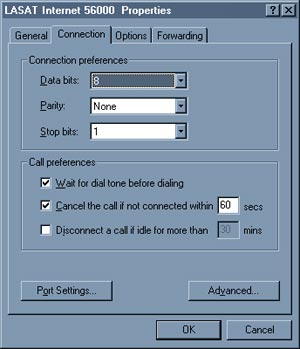
[Step 8:] Under the pane "Connection", your settings should be as follows:
Connection preferences:
Data bits: 8
Parity: None
Stop bits: 1
Call preferences:
Wait for call before dialing
Cancel the call if not connected within 60 secs
Now click "OK" to return to the first window of the DUN Make New Connection Guide (as seen under Step 6) - here you click "Next >" to proceed |
 |
| |
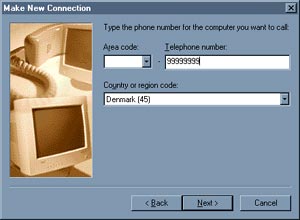
[Step 9:] Now you type in the phone number based on your location in the field "Telephone Number" See Dialup Access Numbers for the appropriate phone number for your area.
Now click "Next >" to proceed |
 |
| |
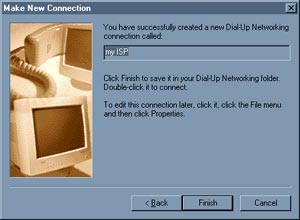
[Step 10:] The final window of the DUN Make New Connection Guide now appears. Click "Finish" to complete the installation, and follow any on-screen instructions.
When the installation is complete, you are returned to the Dial-Up Networking Window, where the new connection you have just made now appears (in this example, myISP) |
 |
| |
| [Step 11:] Right-click on the new connection (here: myISP) and chose "Properties" |
 |
| |
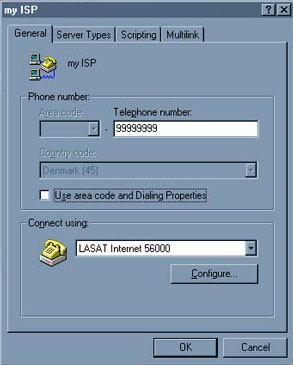
[Step 12:] A window named as your connection (in this example myISP) opens.
In the first pane called "General", you will see a field called "Telephone number" where the phone number to Argon which you typed in under Step 9 appears.
Also there is the field called "Connect using" where your modem is selected (as you did under Step 6). There is no need to click Configure, as this has already been done under Steps 7 + 8.
Now click the pane "Server Types" |
 |
| |
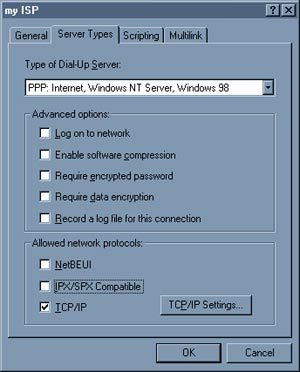
[Step 13:] Now you can see the contents of the pane "Server Types."
In the field "Type of Dial-Up Server", you make sure that the value "PPP; Internet; Windows NT Server; Windows 98" is selected.
Under "Advanced options", you uncheck all the selected boxes.
Under "Allowed network protocols", you make sure that the only protocol selected is "TCP/IP"
Now click "OK" to close this window and return to the Dial-Up Networking window. |
 |
^TOP^
|
|